
Replacing a leaking shower valve or fixing a fluctuating water temperature requires dealing with one of the most hidden yet critical components in residential plumbing: the shower cartridge. Homeowners and maintenance professionals alike often find themselves staring at a tiny, complex assembly of plastic, brass, and rubber seals removed from a wall cavity, wondering how on earth to find an exact replacement. Because manufacturers change valve designs over decades—and because minor dimensional variations prevent generic parts from sealing correctly—relying on guesswork leads to frustrating leaks, ruined wall finishes, and repeated trips to the hardware store.
A systematic approach to shower cartridge identification bridges the gap between an anonymous, dripping valve and a precise repair part. By examining structural traits, handle operations, brand-specific footprints, and precise physical dimensions, you can cut through the thousands of variations currently on the market. This guide provides a comprehensive framework, detailed taxonomy, and reference tools to help you accurately identify, source, and replace your shower cartridge the first time.
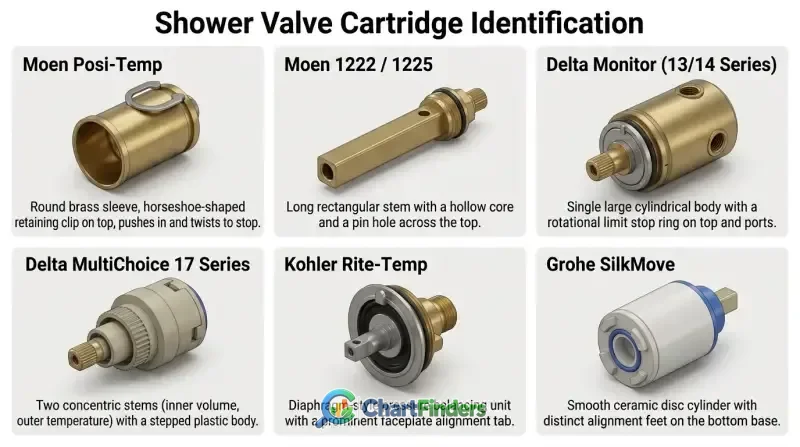
Shower Cartridge Identification Chart
- Always shut off the main water supply and plug the drain with a rag before attempting to pull any shower cartridge.
- Handle operation type (single-lever balancing, two-handle compression, or thermostatic dual-control) immediately narrows down your cartridge category.
- Measure critical dimensions—including total length, barrel diameter, stem length, and mounting screw locations—using digital calipers.
- Major manufacturers like Moen, Delta, and Kohler use distinct proprietary color codes, retainer styles, and stem configurations.
- Visual matching against manufacturer identification charts prevents costly trial-and-error replacements.
- Inspect the valve body interior for mineral buildup or leftover O-rings before pushing a new cartridge into place.
Navigating the vast ecosystem of shower valves requires a structured classification system. The chart below categorizes the most common shower cartridge families by brand, handle configuration, body material, and primary identifying features to simplify your initial diagnosis.
| Manufacturer / Family | Handle Type | Material & Color | Key Identifying Features | Common Application |
|---|---|---|---|---|
| Moen Posi-Temp | Single-Lever | Brass body with plastic stem | Round brass sleeve, horseshoe-shaped retaining clip on top, pushes in and twists to stop. | Pressure-balanced single-handle tubs and showers. |
| Moen 1222 / 1225 | Single-Lever | Plastic or Brass | Long rectangular stem with a hollow core and a pin hole across the top. | Standard Moen single-handle pressure balancing. |
| Delta Monitor (13/14 Series) | Single-Lever | White plastic body, gray cap | Single large cylindrical body with a rotational limit stop ring on top and side ports. | Delta pressure-balanced showers manufactured post-1993. |
| Delta MultiChoice 17 Series | Dual-Function Lever | White/Clear plastic with dual stems | Two concentric stems (inner volume, outer temperature) with a stepped plastic body. | Independent volume and temperature control showers. |
| Kohler Rite-Temp | Single-Lever | Green or black plastic housing | Diaphragm-style pressure balancing unit with a prominent faceplate alignment tab. | Kohler pressure-balanced valve installations. |
| Grohe SilkMove | Single-Lever | Blue or black plastic housing | Smooth ceramic disc cylinder with distinct alignment feet on the bottom base. | European-style high-end single-handle mixers. |
Understanding how these primary families differ in operational mechanics and visual presentation forms the foundation of accurate plumbing diagnosis. The following sections break down the specific diagnostic paths you must follow.
Step 1: Analyze Handle Operation and Valve Function
The first and most reliable diagnostic filter is how the shower handle moves. Faucet and shower engineering dictates that the internal cartridge mechanism directly mirrors the external handle movement.
- Single-Lever Pressure Balanced: The handle rotates to adjust temperature and pulls outward or lifts upward to control volume. These cartridges usually feature a spool or balancing spool inside a cylindrical housing to protect against sudden pressure drops in hot or cold supply lines.
- Two-Handle or Three-Handle Compression / Ceramic: Each handle rotates independently through a 90-degree or multi-turn arc. These cartridges often rely on ceramic discs or rubber washers and are separated into distinct hot and cold assemblies (and a third diverter cartridge for tub spouts).
- Thermostatic Control: These systems use dual handles or a concentric dial system where temperature is set independently of water volume via a wax-thermocouple element inside the cartridge body.
Step 2: Extract and Inspect the Cartridge
You cannot reliably identify a shower cartridge while it remains buried inside the valve body. Safe extraction requires a methodical sequence to prevent damaging the surrounding plumbing infrastructure.
- Shut Off the Water: Locate the service stops on the valve body behind the escutcheon plate if available; otherwise, shut off the main water supply to the entire home. Open the shower handle to drain residual pressure.
- Remove Trim Components: Pry off any decorative caps, loosen set screws with an Allen wrench, and slide off the handle and sleeve. Remove the decorative escutcheon plate.
- Remove the Retaining Clip: Most modern pressure-balanced valves secure the cartridge with a horseshoe-shaped metal retaining clip (sometimes called a hairpin clip). Pull this clip straight up or out using pliers.
- Extract the Cartridge: Cartridges often seize inside the valve body due to mineral deposits (calcium and lime). Use a dedicated cartridge puller tool designed for your specific brand rather than wrenching forcefully on the plastic stem, which can snap the internal shaft and leave the barrel trapped inside the wall.
Step 3: Take Precise Physical Measurements
When visual identification fails or yields multiple look-alike options, physical dimensions provide definitive proof. Use a digital caliper to measure the following parameters:
- Total Length: Measure from the very tip of the control stem to the base of the cartridge body.
- Barrel Diameter: Measure the outer diameter of the cylindrical housing that slides into the brass valve body.
- Stem Dimensions: Measure the length, thickness, and profile (flat-sided, spline count, or threaded) of the stem that connects to the handle.
- Port and O-Ring Placement: Note the exact locations of inlet/outlet holes and sealing O-rings along the barrel wall.
Brand-Specific Identification Guide
Different plumbing manufacturers stamp unique signatures onto their parts. Recognizing these brand fingerprints saves hours of cross-referencing.
Moen Cartridges
Moen is famous for standardization across vast product lines. The Moen 1225 (and its brass counterpart, the 1200) features a long, hollow brass or plastic stem with a horizontal pin hole. The Moen Posi-Temp (1222) has a broader, squared stem configuration housed within a cylindrical brass sleeve. Older Moen two-handle faucets utilize traditional brass stem extensions with distinct broach patterns.
Delta Cartridges
Older Delta single-handle valves rely on a ball valve mechanism with a hemispherical stainless steel ball resting on rubber seats and springs. Modern Delta Monitor valves use a self-contained cartridge with a white plastic shell and an integrated blue or gray rotational limit stop cap on top.
Kohler Cartridges
Kohler utilizes heavy-duty ceramic disc and pressure-balancing designs. The Rite-Temp series is instantly recognizable by its distinct green or black plastic body housing and internal diaphragm assembly. Older Kohler faucets may use heavy all-brass compression stems.
Comparative Analysis of Major Shower Cartridge Families
To further assist in identification, the following comparison details the operational lifespan, valve type, and internal sealing mechanism for the industry’s most widely installed cartridge families.
| Brand Family | Typical Lifespan | Primary Sealing Mechanism | Common Failure Mode | Ease of Extraction |
|---|---|---|---|---|
| Moen 1225 / 1222 | 8–12 Years | Rubber O-rings & spool | Leaking at spout, stiff handle rotation, mineral lock | Moderate (Requires puller tool if scaled) |
| Delta Monitor 13/14 | 7–10 Years | Pressure balancing spool & seals | Temperature fluctuation, dripping showerhead | Easy to Moderate (Cap removal needed) |
| Kohler Rite-Temp | 10–15 Years | Diaphragm assembly & O-rings | Complete loss of hot or cold mix, internal weeping | Moderate (Requires faceplate alignment care) |
| Price Pfister Pressure Balance | 6–10 Years | Ceramic disc / Spool assembly | Cross-mixing (hot water in cold lines) | Difficult (Prone to seizing in valve body) |
Common Identification Mistakes and Pitfalls
Plumbing repair is rife with subtle traps that can lead to purchasing the wrong part or damaging new components during installation.
- Confusing OEM with Generic Equivalents: While aftermarket universal cartridges exist, they occasionally feature slightly thinner O-rings or mismatched tolerances that lead to slow, hidden leaks inside the wall cavity. Whenever possible, match the exact OEM part number.
- Ignoring Broach Patterns on Stems: Two handles might look identical from a distance, but the number of “teeth” or splines on the brass stem (the broach pattern) can differ between brands like Price Pfister, Gerber, and Glacier Bay. Handles will strip out if forced onto an incompatible stem spline.
- Failing to Clean the Valve Body: Pushing a new cartridge into a valve body choked with mineral scale will pinch the new O-rings, causing immediate leaks. Always clean the interior bore with a non-abrasive brush and apply plumber’s silicone grease.
- Reinstalling Retaining Clips Incorrectly: Forcing a retaining clip back into a valve body when the cartridge is not fully seated will cause the cartridge to blow out under water pressure when the main supply is turned back on.
Frequently Asked Questions
If the cartridge has no visible part numbers or brand logos, take high-resolution photographs from multiple angles alongside a ruler. Measure the total length and barrel diameter precisely. Compare these dimensions and the stem shape against visual identification charts provided by major plumbing supply distributors or manufacturer online portals.
Universal cartridges can work in a pinch for certain common legacy valves, but they carry a higher risk of improper sealing or premature failure compared to OEM parts. Because shower valves are sealed behind finished walls, using the exact manufacturer-specified cartridge is strongly recommended to prevent costly water damage.
Mineral scale, calcium deposits, and hard water buildup act like glue, cementing the brass or plastic cartridge barrel against the inner brass valve wall. Never yank violently with standard pliers. Use a specialized cartridge puller tool that grips the stem and leverages against the valve face to extract the component safely without shearing the body.
The rotational limit stop is a small, adjustable plastic ring (often red or white) located on top of single-handle pressure-balanced cartridges like Delta Monitor and Moen Posi-Temp models. It restricts how far the handle can be turned toward the “hot” setting, preventing accidental scalding. During replacement, ensure this stop is set to your preferred maximum temperature before reinstalling the handle trim.
Shower cartridges do not have a strict expiration date, but they typically last between 5 and 15 years depending on water hardness and usage frequency. You will know it is time for a replacement when the handle becomes stiff to operate, water continues to drip from the showerhead when turned off, or you experience wild temperature fluctuations.
Conclusion
Identifying an unknown shower cartridge requires patience, methodical measurement, and careful observation of handle mechanics and brand-specific traits. By turning off your water supply, safely extracting the component, and matching its physical footprint against a reliable shower cartridge identification chart, you eliminate the guesswork of plumbing repairs. Taking the time to verify dimensions, clean the valve housing, and select the correct replacement part ensures a leak-free repair that restores full control over your shower’s temperature and water flow for years to come.