
Accurately identifying a piece of lumber is one of the most fundamental yet challenging skills in woodworking, timber trading, and historic preservation. Whether you are restoring a 19th-century mahogany writing desk, verifying compliance with the Lacey Act for imported timber, or selecting the correct domestic hardwood for high-wear flooring, guessing the species simply will not suffice. Environmental factors, trade misnomers, and an overwhelming number of look-alike species mean that visual surface inspection alone frequently leads to costly mistakes. This is where a reliable wood identification chart becomes indispensable.
Far more than a simple picture guide, a professional wood identification chart relies on wood anatomy—the immutable cellular architecture of trees. By examining how water and nutrients once traveled through the living tree, woodworkers can unlock the unique fingerprint of a species. This comprehensive guide explores the structural mechanics of wood identification, how to read and apply identification charts, the key diagnostic features to look for, and the inherent limitations of working with timber identification keys in the field.
Understanding the Wood Identification Chart
- Wood identification charts rely primarily on cellular anatomy visible through a 10x jeweler’s loupe rather than surface color or grain pattern alone.
- Softwoods (conifers) and hardwoods (broad-leaved trees) possess fundamentally different internal structures, requiring completely separate identification pathways.
- Macro-features—such as ring porosity, resin canals, parenchyma band patterns, and ray width—form the backbone of standard field identification charts.
- Physical properties like density, specific gravity, natural luster, and distinctive odors provide crucial secondary verification for ambiguous samples.
- Common identification errors stem from relying on surface finish, failing to check end-grain surfaces, or confusing commercial trade names with botanical species.
At its core, a wood identification chart serves as a decision-making filter. Because the tree kingdom contains tens of thousands of woody plant species, organizing them into a digestible reference requires categorizing timber by structural constants. Unlike leaves and bark—which are stripped away during milling—internal wood anatomy remains consistent throughout the trunk, allowing woodworkers to identify finished boards, antique furniture, and archaeological artifacts.
A comprehensive identification chart typically divides woods into two primary botanical and structural classifications: softwoods (Gymnosperms, such as pines, firs, and cedars) and hardwoods (Angiosperms, such as oaks, maples, and mahoganies). Note that these terms are botanical designations rather than measures of physical hardness; some softwoods (like yew) are physically harder than certain hardwoods (like balsa).
Once separated by softwoods and hardwoods, charts use hierarchical branching logic. They guide the user from broad categories down to specific genera or species based on observable anatomical features. Mastering this chart requires understanding the three primary anatomical planes of wood:
- Transverse (End-Grain): The cross-section cut perpendicular to the length of the tree trunk. This is the most crucial plane for wood identification, revealing growth rings, pore distribution, and ray structures.
- Radial (Quarter-Sawn): A longitudinal cut made parallel to the radius of the log (passing through the pith). This face highlights ray fleck in species like white oak and provides straight, stable grain lines.
- Tangential (Plain-Sawn): A longitudinal cut made at a right angle to the radius, tangent to the growth rings. This face displays cathedral grain patterns in hardwoods and is the most common cut found in commercial lumberyards.
| Wood Category | Pore Structure | Key Diagnostic Features | Common Examples | Primary Identification Plane |
|---|---|---|---|---|
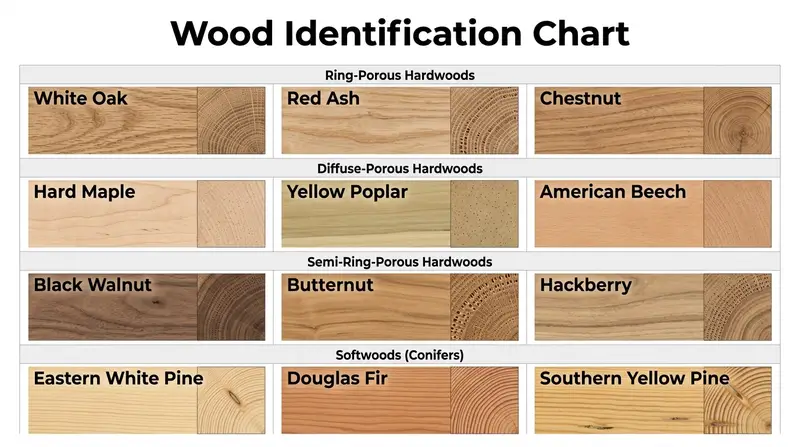
| Ring-Porous Hardwood | Vessels abruptly larger in earlywood than latewood | Distinct growth ring boundaries, multi-seriate rays, tyloses | White Oak, Red Ash, Chestnut | Transverse (End-Grain) |
| Diffuse-Porous Hardwood | Vessels uniform in size across growth ring | Even pore distribution, scalariform or simple perforation plates | Hard Maple, Yellow Poplar, American Beech | Transverse (End-Grain) |
| Semi-Ring-Porous Hardwood | Vessels gradually or moderately decrease in size | Intermediate transition zone between earlywood and latewood | Black Walnut, Butternut, Hackberry | Transverse (End-Grain) |
| Softwood (Conifer) | No true vessels (tracheids only) | Resin canals (in some families), abrupt or gradual transition | Eastern White Pine, Douglas Fir, Southern Yellow Pine | Transverse and Radial |
Before diving into a physical sample, it helps to understand how to read the data within a standard wood identification chart. The table above outlines the foundational structural split used by wood technologists. When evaluating an unknown board, your first step must always be examining the end-grain under magnification to determine which row of the table matches your sample.
Macro-Anatomical Features Used in Identification Charts
When using an identification chart, you will encounter specific anatomical terminology. Understanding these structural markers allows you to cross-reference your sample with confidence.
Porosity and Vessel Arrangements in Hardwoods
Hardwoods contain vessels (pores) that transport water from the roots to the canopy. On an end-grain surface magnified 10x, these pores appear as tiny holes or tubes. Charts classify hardwoods into three distinct porosity types:
- Ring-Porous: The tree rapidly produces large-diameter vessels in the spring (earlywood) to maximize water transport, followed by smaller, thicker-walled vessels in the summer (latewood). This creates distinct, eye-catching rings visible to the naked eye in species like oak, ash, and elm.
- Diffuse-Porous: Vessels are roughly equal in size and distributed evenly throughout the entire growth ring. Examples include maple, birch, cherry, and basswood. These woods often show subtle growth ring boundaries.
- Semi-Ring-Porous: An intermediate classification where earlywood contains slightly larger pores that gradually or abruptly transition into smaller latewood pores, though the shift is less dramatic than in ring-porous woods. Black walnut and teak exhibit this trait.
Ray Tissue and Cellular Rays
Wood rays are ribbon-like cellular structures running horizontally from the center of the tree (pith) outward toward the bark. They store nutrients and transport them laterally. On a chart, rays are described by their width and visibility:
- Uniseriate vs. Multiseriate: Rays can be one cell wide (invisible without a microscope) or several cells wide (visible with a hand lens).
- Ray Fleck: On quarter-sawn radial surfaces, wide rays catch the light and create a shimmering, reflective ribbon pattern, most famously seen in quarter-sawn white oak and sycamore.
Parenchyma and Longitudinal Patterns
Parenchyma cells are living storage tissue that appear lighter in color than surrounding fibers. On an end-grain chart, parenchyma patterns are critical taxonomic markers:
- Apotracheal: Parenchyma that occurs independently of the growth pores (diffuse, banded, or reticulate).
- Paratracheal: Parenchyma associated directly with the pores. This includes vasicentric (surrounding a pore in a halo), aliform (winged extensions), and confluent (connecting multiple pores into wavy bands, common in tropical exotics).
Resin Canals and Softwood Markers
Because softwoods lack vessels, identification charts rely on different markers. The presence or absence of resin canals—tubular channels that secrete defensive resin—is a primary differentiator. Pine, spruce, larch, and Douglas-fir possess resin canals, which appear as tiny white or dark dots on the end-grain (often requiring a lens). True firs, cedars, hemlocks, and redwoods lack normal resin canals.
Physical, Chemical, and Sensory Identification Markers
While cellular anatomy provides the backbone of any wood identification chart, physical and sensory properties act as vital secondary confirmation tools. These attributes require no microscopic equipment and can quickly narrow down a shortlist of candidate species.
Color, Luster, and Aging
Freshly cut wood often exhibits brilliant coloration that oxidizes and darkens upon exposure to ultraviolet light and oxygen. For instance, freshly milled American black cherry appears pale pinkish-brown but deepens to a rich, lustrous reddish-brown within months. Conversely, purpleheart emerges a dull grayish-brown when freshly cut and only develops its vibrant violet hue after being exposed to air or artificial UV light. Identification charts frequently note both freshly cut and weathered heartwood colors.
Odor and Chemical Extractives
Many woods contain volatile organic compounds and natural chemical extractives that deter fungi and insects. These compounds impart distinct, long-lasting odors:
- Aromatic Cedars (Juniperus virginiana): Emit a strong, pleasant closet-cedar scent.
- Port Orford Cedar (Chamaecyparis lawsoniana): Features a pungent, distinctively sharp, gingery or chemical odor.
- Camphorwood (Cinnamomum camphora): Possesses a powerful, medicinal camphor scent.
- African Mahogany / Sapele: Often exhibits a faint cedar-like or spicy scent when freshly sanded, though some exotic species smell rubbery or unpleasant.
Tip: If a sample is old or finished, scraping away the top layer to expose fresh wood and lightly breathing on it (or dampening it with distilled water) can reactivate latent extractives.
Density and Specific Gravity
Specific gravity (SG) measures a wood’s weight relative to an equal volume of water, independent of moisture content. Heavy-weight champions like lignum vitae (SG ~1.25) sink instantly in water, while lightweight species like balsa (SG ~0.15) float high. A quick heft test combined with a density listing on your chart can immediately separate dense tropical hardwoods from lighter temperate species.
Step-by-Step Field Identification Process
When faced with an unknown piece of timber on the workbench or job site, following a structured sequence prevents false conclusions. Use this step-by-step workflow alongside your identification chart:
- Prepare a Clean End-Grain Surface: Never try to identify wood on a dusty, sanded, or dull-sawed end-grain. Use a razor-sharp utility knife or chisel to pare away a thin, clean slice across the transverse face. This opens up the cellular lumen and reveals the true pore structure.
- Magnify and Inspect Porosity: Hold a 10x or 20x jeweler’s loupe directly against the freshly pared end-grain under bright, angled lighting. Ask: Are pores present (hardwood) or absent (softwood)? If present, are they ring-porous, diffuse-porous, or semi-ring-porous?
- Examine Growth Ring Boundaries and Rays: Look for distinct lines separating annual rings. Check if the rays are visible without magnification or if they require a loupe. Note whether the rings show abrupt or gradual transitions between earlywood and latewood.
- Check Parenchyma and Special Features: Look for lighter-colored bands, winged pores, or resin canals. If working with a softwood, check for distinct odor and resin exudation.
- Assess Physical Properties: Note the color, grain straightness, weight (density), and natural luster of the board. Perform a scratch test or smell test if extractives are suspected.
- Cross-Reference the Chart: Match your anatomical and physical observations against the elimination keys in your wood identification chart. Follow the branching prompts until you narrow the sample down to a specific family, genus, or species.
- Verify with Known Reference Samples: Whenever possible, compare your unknown sample against an authenticated reference wood collection (xylarium) to confirm visual and tactile match.
Common Mistakes and Limitations in Wood Identification
Even experienced woodworkers and timber inspectors can misidentify wood if they fall into common analytical traps. Understanding these limitations prevents costly errors.
The Danger of Relying Solely on Surface Grain
Board appearance can be deceptive. Flat-sawn, quarter-sawn, and end-grain faces of the exact same tree look entirely different. , modern staining, bleaching, and finishing techniques can easily mimic expensive exotic woods on cheap domestic substrates (e.g., staining red oak to look like mahogany or staining poplar to imitate walnut). Always inspect the raw, unfinished end-grain.
Trade Names vs. Botanical Species
Commercial lumber markets are notorious for using loose, misleading common names. For example, “Philippine Mahogany” is not a true mahogany (Swietenia or Khaya species) at all, but rather belongs to the Dipterocarpaceae family (Meranti/Lauan). Similarly, “Australian Cypress” is actually a conifer (Callitris species) rather than a true cypress (Cupressus). Professional charts always reference scientific binomial names (Genus and species) to eliminate ambiguity.
Infraspecific Variability
Tree growth conditions—such as soil chemistry, climate, growth rate, and latitude—cause natural variation within the same species. Fast-grown white oak may have wide growth rings and heavy earlywood pores, while slow-grown white oak from a shaded forest floor may feature tight, dense rings. A robust identification chart accounts for typical ranges of variation rather than relying on a single ideal specimen.
Frequently Asked Questions
Can a wood identification chart identify finished or painted wood?
It is extremely difficult to identify finished, painted, or heavily weathered wood using standard charts. Finishes clog the cell lumens and obscure natural color and odor, while paints completely block visual inspection. To use an identification chart effectively on finished furniture, you must find a hidden, unfinished area (such as the underside of a table apron or inside a mortise) and pare a fresh end-grain slice.
Do I need a microscope to use a wood identification chart?
Most field identification charts are designed for macroscopic examination using a simple 10x or 20x jeweler’s loupe. You can easily distinguish ring porosity, ray visibility, resin canals, and parenchyma patterns with basic magnification. However, separating closely related species within the same genus (such as specific oaks within the Quercus genus or pines within Pinus) often requires microscopic examination of cellular features like pit pairs and perforation plates in a laboratory setting.
What is the difference between Red Oak and White Oak on an identification chart?
On an end-grain chart, the easiest way to separate Red Oak from White Oak is by examining the pores in the latewood and the presence of tyloses. White Oak features latewood pores that are small, angular, and very numerous, and its large earlywood vessels are completely plugged with bubble-like cellular growths called tyloses, making White Oak naturally waterproof. Red Oak latewood pores are larger and more open, and its earlywood vessels are open and unobstructed by tyloses (you can often blow air right through a short piece of red oak end-to-end).
Why are softwoods harder to identify by sight than hardwoods?
Softwoods lack vessel elements (pores), which are the primary diagnostic roadmap used in most wood identification charts. Instead, softwoods are composed almost entirely of uniform tracheid cells. Identifying softwoods requires examining subtler microscopic features, such as the transition from earlywood to latewood, the presence and epithelial structure of resin canals, and ray tracheid pitting.
How reliable are online or app-based wood identification tools compared to traditional charts?
App-based tools and AI image recognition algorithms have advanced significantly, particularly for identifying macro-features from end-grain photographs. However, they are only as good as the image quality and lighting provided by the user. Traditional printed charts and dichotomous keys remain superior for teaching structural mechanics and forcing the user to verify physical properties (like density, odor, and pore structure) that algorithms often miss.
Conclusion
A wood identification chart is an essential gateway to mastering timber technology. By moving beyond surface appearances and learning to read the microscopic architecture preserved within annual rings, rays, and pores, woodworkers transform guesswork into an exact science. While no single chart can instantly resolve every exotic hybrid or severely weathered antique, utilizing a structured, anatomical approach empowers you to select the right materials, verify authentic hardwoods, and appreciate the remarkable biological complexity hidden inside every board.