
Replacing a chainsaw chain seems straightforward until you walk down the parts aisle or browse an online catalog and realize that even a single chainsaw model can run multiple bar lengths, bar types, and chain profiles. Installing the wrong chain can lead to catastrophic failure, severe binding, premature bar wear, or dangerous kickback hazards. Whether you are a professional logger managing multiple powerheads or a landowner pulling a vintage saw out of the shed, understanding how to accurately decode your cutting attachment is an essential safety and performance skill.
(Reference: Oregon Chainsaw Chain Identification Chart)This comprehensive guide explores the mechanics of Oregon chainsaw chain identification. We will deconstruct the core geometry of saw chains, analyze how pitch, gauge, and drive links interact, examine stamp codes, and provide actionable identification workflows. By mastering these principles, you will never have to guess when ordering a replacement loop again.
Explore our detailed breakdown on Snowrunner Tire Chart.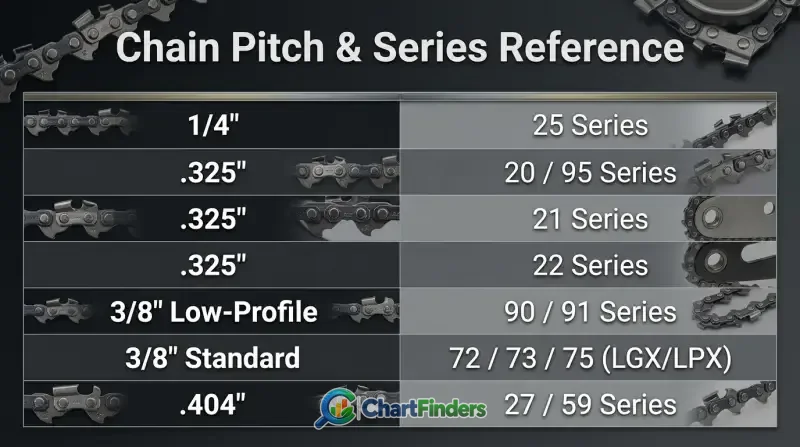
Oregon Chainsaw Chain Identification Chart
- The Core Trio: Every Oregon chain is defined by its pitch, gauge, and drive link count. You must match all three precisely.
- Pitch Measurement: Measured across three consecutive rivets and divided by two. Common commercial pitches include 1/4″, .325″, 3/8″, and .404″.
- Gauge Accuracy: Ranging typically from .043″ to .063″, gauge must match the guide bar groove width exactly to prevent rocking or pinching.
- Drive Link Count: Counting the individual drive teeth (the bottom tangs that ride inside the bar groove) determines the exact loop length.
- Link Stamping: Oregon stamps small numerical codes on the drive links to indicate cutter type, chassis design, and series.
- Low-Profile vs. Full-Size: Never mix up 3/8″ standard pitch with 3/8″ low-profile (often labeled 91 series) pitch; they are entirely incompatible.
The chainsaw chain identification chart serves as the bridge between raw physical measurements and manufacturer part numbers. Because Oregon supplies chains for virtually every major saw brand on the market—including Husqvarna, Stihl, Echo, and Poulan—their numbering system is built around standardized mechanical dimensions rather than saw models alone. When you know your chain’s physical geometry, finding the correct Oregon part family becomes an exact science.
The following reference table outlines the major specifications across common pitch and gauge categories used in light-duty, mid-range, and professional forestry applications, along with industry cross-references.
| Pitch | Gauge | Oregon Series / Family | Stihl Equivalent | Husqvarna Equivalent | Common Application | Typical Cutter Profile |
|---|---|---|---|---|---|---|
| 1/4″ | 0.050″ (1.3mm) | 25 Series | 13RM | H00 / E1 | Carving, lightweight pruning, pole saws | Chisel / Semi-Chisel |
| .325″ | 0.050″ (1.3mm) | 20 / 95 Series | 23 / 26 (RS/RM) | H22, H23, H30 | Mid-range saws (38cc to 55cc) | Semi-Chisel / Micro-Chisel |
| .325″ | 0.058″ (1.5mm) | 21 Series | 25 | H25, H21, H38 | Mid-range professional / farm use | Semi-Chisel / Full Chisel |
| .325″ | 0.063″ (1.6mm) | 22 Series | 36 | H26 | Heavy mid-range / European hardwoods | Full Chisel |
| 3/8″ Low-Profile | 0.043″ / 0.050″ | 90 / 91 Series | 61 / 63PS | H36 / S35 | Consumer saws, light pruning, electrics | Chamfer Chisel (Low Kickback) |
| 3/8″ Standard | 0.050″ / 0.058″ / 0.063″ | 72 / 73 / 75 (LGX/LPX) | 33 / 35 / 36 (RS) | H42, H47, H48 | Professional felling and bucking (60cc+) | Full Chisel / Semi-Chisel |
| .404″ | 0.063″ (1.6mm) | 27 / 59 Series | 46 / 47 | H64 | Heavy harvest heads, milling, big timber | Chisel / Skip Tooth |
To use this reference matrix effectively, you must first isolate the physical characteristics of your current chain or guide bar. A mismatch in any single column—such as attempting to run a 0.058″ chain in a 0.050″ bar groove—will result in immediate mechanical failure.
The Three Pillars of Chainsaw Chain Geometry
Every chainsaw chain is governed by three fundamental measurements. Understanding how these dimensions are defined eliminates confusion when consulting identification charts or replacement guides.
1. Pitch: The Distance Between Rivets
Pitch is defined as the size of the chain, calculated as the distance between any three consecutive rivets divided by two. Common industry pitches include:
- 1/4″: Extremely compact, used primarily for carving and lightweight pole pruners.
- .325″: The standard for mid-range landowner saws, offering a smooth cut with moderate power demands.
- 3/8″: The most popular pitch worldwide. Available in both Low-Profile (narrow kerf for smaller saws) and Standard (heavy-duty for professional felling). Note: 3/8″ Low-Profile and 3/8″ Standard parts are completely incompatible with each other.
- .404″: Heavy-duty professional pitch designed for high-displacement saws, harvesters, and Alaskan chain saw mills.
2. Gauge: The Thickness of the Drive Link
Gauge refers to the thickness of the drive link’s tail—the portion that fits down into the guide bar groove. Matching this dimension is critical; if the gauge is too thick, the chain will not fit into the bar. If it is too thin, the chain will wobble, rock excessively, cause uneven bar rail wear, and throw easily.
Standard Oregon gauge measurements include:
- .043″ (1.1 mm): Ultra-thin consumer and battery saws.
- .050″ (1.3 mm): The most common gauge for light-to-mid commercial and consumer saws.
- .058″ (1.5 mm): Common on mid-to-large saws, particularly European brands like Husqvarna.
- .063″ (1.6 mm): Heavy-duty professional standard, favored in hard-wood felling and high-wear environments.
3. Drive Link Count: Total Length
Pitch and gauge determine the “profile” of the chain, but the drive link count determines its total length. Two saws can run the exact same pitch and gauge yet require completely different chain lengths depending on the guide bar manufacturer, mount type, and tooth count on the sprocket nose. Counting drive links requires manual physical verification.
Step-by-Step Chain Identification Workflow
When you do not have the original packaging or part number, you must extract the specifications directly from the physical equipment. Follow this step-by-step workflow to identify your chain accurately.
- Safety First: Ensure the chainsaw engine is turned off, the spark plug wire is disconnected (or the battery is removed on electric models), and wear heavy leather work gloves to protect your hands from sharp cutters.
- Clean the Chain and Bar: Wipe away accumulated sawdust, pitch, and oil from the guide bar and the side of the chain drive links using a wire brush or scraper.
- Count the Drive Links: Pull the chain slightly away from the bar groove. Count every single drive link (the interior triangular or hooked metal tangs that ride inside the bar channel). Marking your starting point with a piece of chalk or a marker helps ensure an accurate count.
- Measure the Pitch: Take a ruler or caliper and measure the distance from the center of one rivet to the center of the third rivet in line. Divide that total measurement by two. For instance, if three rivets span 3/4 of an inch, dividing by two gives you a 3/8″ pitch. Alternatively, look at the stamped number on your drive link.
- Measure the Gauge: Use a digital caliper to measure the exact thickness of a drive link’s lower tang where it rides in the bar groove. Do not measure the painted body or the cutting tooth; measure the raw steel of the tail. Match this reading to standard sizes (.043, .050, .058, or .063).
- Check the Guide Bar Stampings: Most guide bars feature laser-etched or stamped specifications near the mounting tail. These stamps typically list the pitch, gauge, and drive link count required for that specific bar.
Decoding Oregon Stamped Part Numbers and Codes
Oregon stamps specific numbers and letters directly onto the side of their drive links and cutter components. While these stamps do not always spell out the complete retail part number, they provide immediate clues regarding the chain family and chassis specifications.
For example, a drive link stamped with the number 91 indicates a 3/8″ low-profile, narrow-kerf consumer chain. A drive link stamped with 72 indicates a standard 3/8″ pitch, .050″ gauge professional full-chisel chain (such as Oregon’s popular LGX series).
, cutter top-plates feature filing angle indicator lines (usually etched at 25 or 30 degrees) to help sharpeners maintain correct geometry. Understanding these factory markings ensures that when you file or replace components, you maintain the engineered integrity of the cutter sequence.
Cutter Profiles: Understanding Oregon Chain Types
Beyond pitch, gauge, and length, Oregon chains are classified by their cutter geometry. Selecting the right cutter profile dictates cutting speed, ease of maintenance, and safety characteristics.
Full Chisel Chains
Full chisel chains feature corners with square edges that slice through wood fibers aggressively. They offer the fastest cutting speed in clean wood. However, they dull quickly when exposed to dirt, sand, or bark on dirty logs, and they carry a higher risk of kickback.
Semi-Chisel Chains
Semi-chisel chains feature rounded working corners on the cutters. While they cut slightly slower than full-chisel chains in pristine timber, they retain their edge significantly longer when cutting dirty wood, frozen timber, or brush. They are forgiving, stable, and widely used by homeowners and professional fire crews alike.
Chamfer Chisel / Low-Profile Safety Chains
Engineered primarily for consumer safety, chamfer chisel chains incorporate a small angled bevel between the top plate and side plate. This geometry reduces kickback energy significantly, making them the standard choice for entry-level landowners and lightweight pruning saws.
Common Mistakes in Chainsaw Chain Identification
Even experienced operators occasionally run into trouble when replacing saw chains. Avoiding these common pitfalls will save you time, money, and equipment damage.
- Confusing 3/8″ Low-Profile with 3/8″ Standard: This is the single most frequent ordering error. A 3/8″ low-profile chain (like the 91 series) has a smaller physical footprint and narrower drive links than a standard 3/8″ professional chain (like the 72 series). They are completely incompatible and will skip off the drive sprocket immediately.
- Measuring the Cutter Instead of the Drive Link for Gauge: Measuring the thick top-plate or side-plate will yield an inaccurate gauge reading. Always measure the bottom rail-riding portion of the drive link.
- Ignoring Drive Link Stretch: An old, worn chain stretches over time due to friction and pin wear. Counting the drive links on an old, stretched chain is correct, but measuring its pitch across rivets can sometimes yield a slightly skewed result if the pins have worn loose. Always verify pitch using the guide bar specification or a new drive link.
- Mixing Brands Without Cross-Referencing: Stihl and Husqvarna use proprietary numbering systems that do not map directly to Oregon codes without conversion charts. Do not assume a Stihl part number corresponds to the same Oregon digits.
Frequently Asked Questions
If the bar and chain are unreadable, you must manually determine the three core metrics: count the drive links, measure the pitch by checking the distance between three rivets divided by two, and measure the drive link thickness with a caliper to find the gauge. Once you have these three numbers, cross-reference them with an Oregon identification guide to find your exact series and loop part number.
No. The drive links on a standard 3/8″ chain are too thick and the drive chassis is too large to fit into a low-profile guide bar groove or mesh correctly with a low-profile drive sprocket. Doing so will jam the saw or cause severe mechanical damage.
The numbers stamped on Oregon drive links (such as 20, 21, 22, 72, 91) designate the chain family, pitch, and gauge category. These stamps help technicians and users quickly identify the structural series of the chain chassis.
There is no universal drive link count for a 16-inch bar. The number of drive links depends entirely on the saw manufacturer, the guide bar tail mount configuration, the pitch, and the drive sprocket size. A 16-inch bar might take anywhere from 55 to 68 drive links. Always count the physical links on your old chain rather than relying on bar length alone.
Full-chisel chains have square-cornered cutters that slice wood rapidly in clean conditions, while semi-chisel chains have rounded corners that stay sharp longer when cutting dirty wood, bark, or abrasive materials. Semi-chisel is safer and easier to maintain for general property maintenance.
Conclusion
Accurately identifying an Oregon chainsaw chain comes down to mastering three metrics: pitch, gauge, and drive link count. By taking the time to manually measure your components or decode the stamped markings on your drive links, you eliminate guesswork and ensure optimal cutting performance. Matching your chain precisely to your guide bar and drive sprocket not only maximizes cutting efficiency and extends the lifespan of your equipment, but it also preserves the safety margins designed to prevent dangerous kickback events.